Pages

Sunday, June 23, 2013

Sketchpacker Tools for Beginners - ERASERS

I'm actually writing this post with a bit of reluctance because beginners tend to get very dependent on this tool and end up using them more than they use actual drawing tools (like the pencil). Yes, I'm talking about

E R A S E R S


If you're just starting off sketching, chances are your confidence level isn't very high. Erasers may soon become your best friend if you're not careful, when your best friend should be your pencil. After all, you want to draw, not remove your drawing. But having the security of a safety net that allows you to "Undo" your mistakes is tempting... very tempting... Too tempting, in fact, that many become overly dependent on them that they spend most of the time erasing than drawing, and they miss out on learning how to draw, and learning things from their mistakes, or how to cover up their mistakes.

So before I start, I'd like to suggest that you DON'T bring an eraser out when you go sketching. Get to know your pencil first.


Benefits Of NOT Using an Eraser
I'm not going to start this post like the earlier ones by recommending erasers, since I've already started by telling you not to use them too much. What I'd like to start with, rather, is to share some benefits of NOT using an eraser when you're starting off. Here are 10 reasons I can think of:
  1. It helps you spend more time using the pencil and getting to know it. Trust me, there's a lot to learn about using the pencil and making marks on your paper.
  2. It forces you to think of DRAWING rather than ERASING.
  3. It forces you to be more thoughtful and careful with your linework if you don't have an "undo" function.
  4. It trains your eyes and muscle memory for pencil (rather than eraser) usage.
  5. It trains your comfort and confidence in using your drawing tools.
  6. It forces you to learn from mistakes, and learn how to cover them up without erasing.
  7. Erasing can leave ugly marks that you cannot remove.
  8. Erasing can scratch and damage your paper, and risk crumpling it.
  9. Erasing can smudge your pencilwork.
  10. Eraser dust can be hard to get off your paper, and if you try dusting it off with your hand, you're going to leave smudges and fingerprints on your pencilwork.


Erasers to NOT Use
Having said that, I think most beginners will still use erasers anyway. Erasers are not evil. But if you're using it too much, you're using it wrong. And if you're using the wrong type, you have a good chance of ruining your artwork. That's why I'm so fussy with my erasers - but more of that later.

There are a couple of types of erasers that you should avoid like the plague if you're drawing, unless you absolutely know what you are doing. The first is the ink eraser. I don't have a photo cos I don't own those (Get thee behind me!). They are usually blue and hard, and have glittery specks in them. Why they should be avoided at all costs is because they damage your paper surface. That's how they get ink (which is not erasable) off - they sand the surface right off your paper! If you use those things and erase one spot of your paper long enough, you're going to erase a hole right through it. Guaranteed.

The second type of eraser that should be avoided is the type you typically find at the end of wood pencils.


These erasers are usually poor quality and will leave a black mark on your paper. If you don't believe me, try it for yourself. Then go get a proper eraser.


Erasers I Use (and Why)
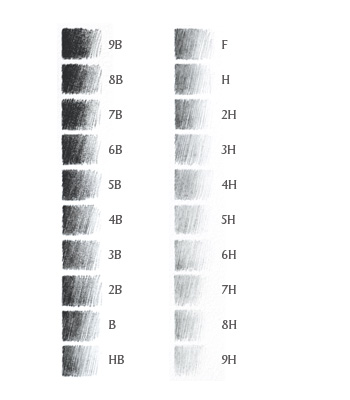
I am very particular with my erasers because when I was younger, I drew a lot, and I found that some erasers (and some papers) left an ugly mark. So I started looking for good erasers (and good sketchbooks with papers that erase well). One of the early erasers I liked was the Mono plastic eraser made by Tombow. It's pretty soft and erases pretty well. (They apparently have different varieties now). Some of my sketcher friends still love it, but I've moved on. Today I use Pentel erasers, but not just any Pentel erasers. I'm particularly partial to the Hi-Polymer Soft plastic erasers.


The two erasers above are practically the same. They do come in different shapes and sizes though. The reason I like them is because they are soft (and so don't scratch the paper surface) and their eraser dust sticks together (so you don't have a lot of small dust particles which are hard to remove). They're easily available at stationery stores.

Of course, the best thing to do is experiment to find the best eraser for your needs. Do note, however, that different erasers may interact with different papers in slightly different ways.


When Erasing Can Be A Good Thing
Having said so much about not using erasers, there are times when using them can be a good thing. In computer terms, it would be using them as a "brush" rather than an "undo" tool. In other words, they are at their best when you are you using them to draw rather than erase.

"Drawing with an eraser?" That may sound weird to some. After all, aren't erasers meant to be used to erase rather than draw? Well, not really. Let me introduce you to a particular type of eraser.


BEHOLD! The Kneadable Eraser!
Kneadable erasers are erasers that can be kneaded into shape. They are something like Blu-Tack, only they're white and less sticky. They are used a lot in charcoal drawings to pick up the charcoal from the surface of the paper to produce lighter areas or highlights (works for graphite and other dry media like pastels too).

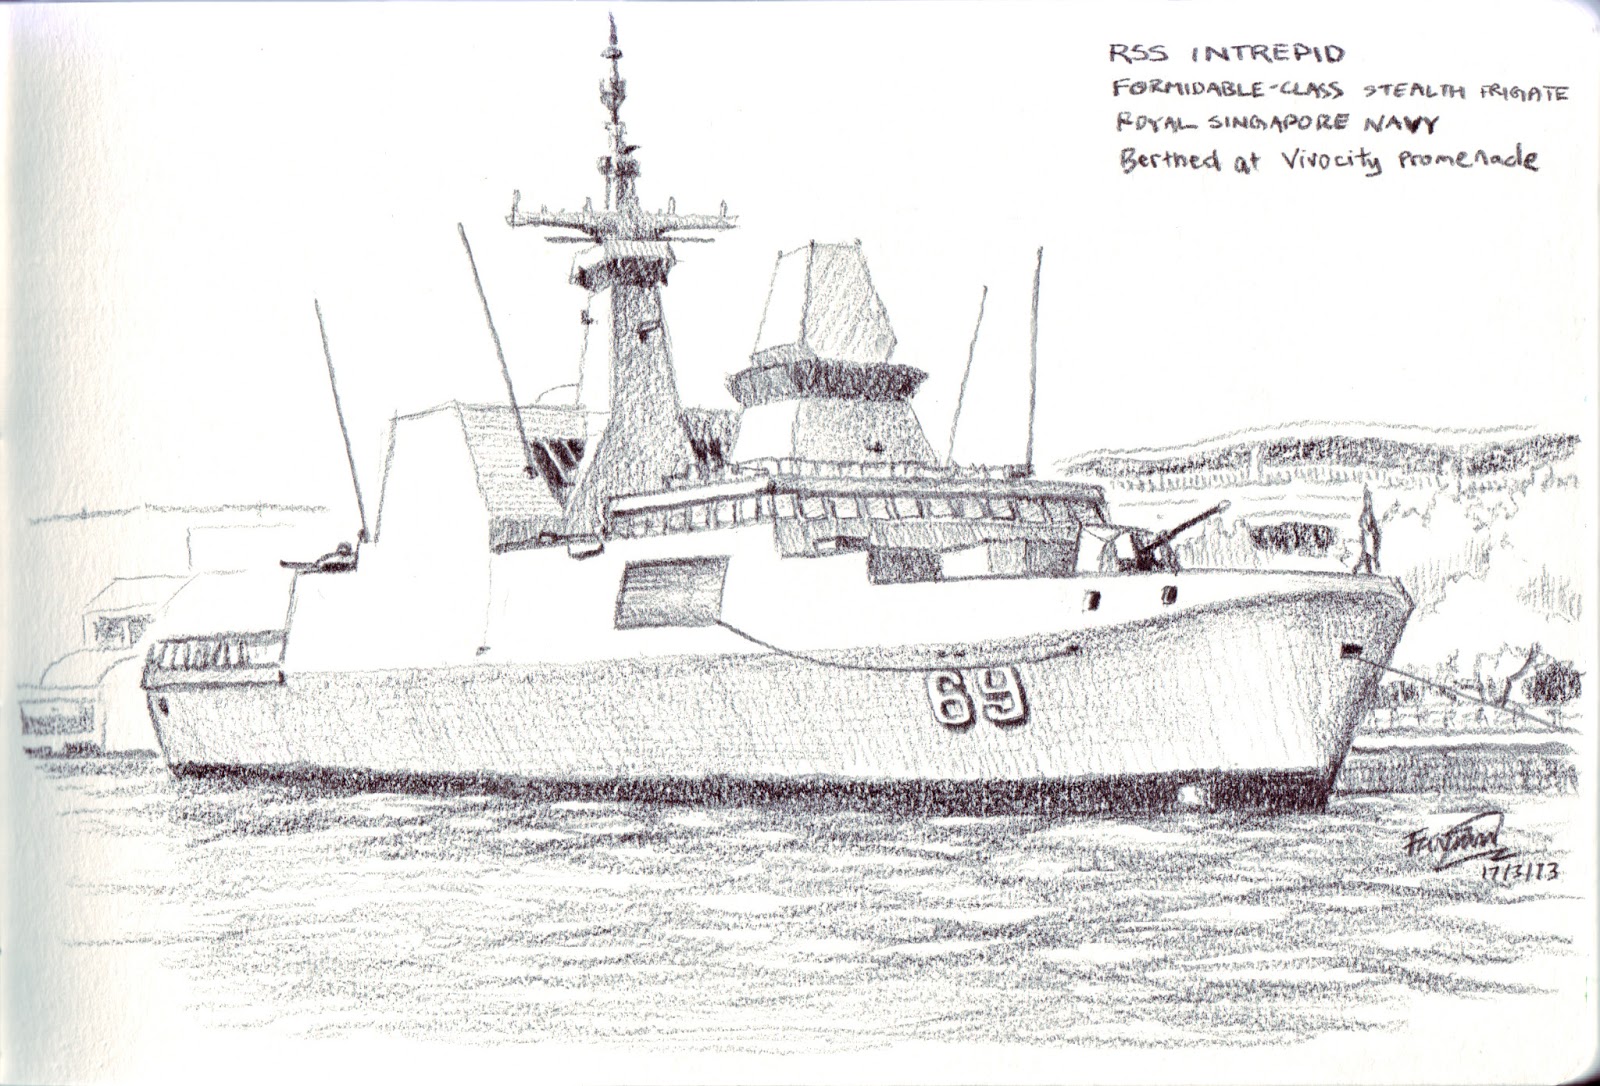
Singapore National Library. charcoal
The grids on the background buildings and some highlights on the left, etc.
were drawn using a kneaded eraser.

In other words, erasers can be used effectively not simply to erase mistakes, but to create deliberate marks as part of your drawing (such as creating highlights). You can use kneaded erasers or just normal ones, or a sliver cut out from your normal eraser for finer work.

Finally before we go, there's one more thing kneaded erasers are good for....

If you need to get away from your sketch for a bit,
a kneaded eraser can provide endless possibilities of entertainment!
But don't go playing putty with your eraser for too long. Get back to sketching!!! *cracks whip*

Tuesday, June 18, 2013

Sketchpacker Tools for Beginners - PENCILS

After talking about materials to draw on in our last post on tools, here's a post about what to draw with. And the very first tool most of us are familiar with is the humble but mighty...

P E N C I L


Do not be fooled. This is not a child's toy. in the hands of a skilled artist, a pencil can produce an image as good as a photograph.


For Starters
As in the last post, I think it would be helpful to start out by suggesting a pencil that a beginner sketchpacker can easily get. Thankfully, good drawing pencils are easily obtainable, and there's a lot less to think about than, say, paper. Faber Castell and Staedtler produce a whole range of pencils with different shapes, lead hardness and lead size. But if you want a multi-purpose pencil to start off with, a 2B pencil would be a good balance of hardness and darkness (more of that later).

Commonly found pencils to start off with


H's, B's and Everything Else
Now you might be wondering what's with those B's and H's and stuff. Those letters indicate the grade of the lead in terms of darkness. "H" refers to "hardness" and "B" refers to "blackness". For leads other than H or B, you might find a number in front of the letter (such as 2B). The higher that number, the greater the hardness of blackness. 10H, therefore, would be a very hard lead and not so dark. 9B would be a very soft and black lead. Hard leads wear down slower and are more suitable for detailed work, while soft leads are darker, but wear down quickly and are more suited for broad strokes.


Pencil leads are a mixture of clay and graphite. Generally speaking, more clay and less graphite would result in a harder lead. But it should be noted that not all manufacturers follow the same recipe. I have found that Lyra's ArtDesign 669 2B is actually relatively harder (and lighter) than Faber Castell's Goldfaber 1221 2B. The best way to find out the differences is to experiment!


Not all pencils follow this grading system. Pencils like the Blackwing and Ebony pencils (in the photo above) don't have these numbers and letters on them. Ebony pencils, for example, are very soft and black and smooth with thick lead cores. Several manufacturers such as Sanford and Prismacolor make Ebony pencils. These pencils are not for fine detail work, but are great for laying tones in broad strokes.

Jurong Bird Park waterfall drawn with Ebony pencil

The Blackwing of today is also a very black and smooth pencil. Its history is quite interesting and it was a very well-known and famous pencil that was the tool of choice of famous animators like Chuck Jones. Today's version is a reproduction of the original using the a similar recipe. More on the Blackwing in the following links:
It's core is narrower than the Ebony pencils and is more suitable for finer work.

Anyway, I get ahead of myself.

If you're bringing wooden pencils around, be sure to bring a sharpener. You can do without an eraser, but unless you're planning to shave the pencil down with a penknife (which can be useful for stylistic purposes), you'll need to sharpen it when the lead has gone into the wood.


Clutch Pencils or Lead Holders

If you have a little more cash to spare, you might want to invest in a lead holder.

Rotring lead holder with lead

Many varieties exist for different lead types and sizes. The most common ones are those that use 2mm lead (similar to the lead cores found in most 2B pencils). Unlike mechanical pencils where you press the rear to advance the lead, pressing the button at the back of a lead holder opens up the clutch at the front so you can move the lead to the desired position/length.

Clutch pencil showing clutch head

Because you're using a length of graphite lead, you don't really need to sharpen it. However if you still wish to do so, you can get a sharpener for the size of lead you are using. Some lead holders have basic sharpeners in the rear button.

Rear sharpener. This one can be removed so the lead can be fed from the back

One of the conveniences of using a lead holder besides not having to sharpen the lead is that you can use different grades of lead in one holder. They tend to be a little heavier than wooden pencils, though, since they're made of metal and plastic.


This is just an intro to pencils. There are many other graphite products out there such as graphite sticks (think: pencils without wood), water-soluble graphite, even graphite powder. Each has its own properties and use.

The pencil, though simple and seemingly primitive, is surprisingly versatile. It can afford you worlds of line variation and tonal values if you learn to wield it well. Below are some of my pencil sketches, but they are only a tiny sample of what you can achieve with this wonderful tool:

Copyright © Favian Ee  2013

Copyright © Favian Ee  2013

Copyright © Favian Ee  2013

Copyright © Favian Ee  2013

Copyright © Favian Ee  2013

Copyright © Favian Ee  2013

Copyright © Favian Ee  2013

Copyright © Favian Ee  2013

Copyright © Favian Ee  2013

I won't go into details about how to use the pencil in this post, but here are some books you might find helpful on pencil sketching:


Happy Sketching!!

Sunday, June 9, 2013

The 25 Least Visited Countries in the World

For those of you who are more adventurous, why not visit one of these countries? Gunnar Garfors lists 25 of the world's least-visited countries, tells us why so few tourists go there, and why someone might want to visit anyway.

http://www.afghanscene.com/may-2013-issue-may-2013-issue/10384-the-25-least-visited-countries-in-the-world

And don't forget your sketchbook and sketching tools!

Saturday, June 1, 2013

A Word on Mistakes

I guess one of the things that keeps a lot of us from even starting to sketch is the fear of making mistakes. Probably a lot of the time, those who say "I can't draw" actually mean "If I tried, I'm going to make a mess (i.e. make a lot of mistakes)". Of course, the reality is The Only People Who Can't Draw Are Those Who Never Try. After all, even a bad drawing is still a drawing. And everybody starts of - guess what? - bad. The sooner we realise this, the better, and the sooner you'll be enjoying doing bad drawings for nobody but yourself. In time, if you keep at it, you'll be proud to share your works - no matter how humble - with others who at one point in time thought the same way as you do now. And with others who can help you get even better.

So here's a little something to help you put aside those irrational fears and get you out of your comfort zone.


Mistakes Are Part of Sketching

Mistakes and accidents happen to even the best and most experienced of us. A stray line, wrong perspective, wrong details, ink spills, wrong proportions... the list goes on and on. It happens all the time, though maybe less if you've been practising a lot. It's just part and parcel of the nature of sketching. You don't have days or weeks to plan your composition, do your studies, lock your ideas down before taking your time to execute them to perfection. You're trying to finish a quick drawing within an hour or even a few minutes. Sooner or later, you're bound to make a mistake! In fact, you can count on it. 

Copyright Favian Ee 2013

Mistake: Stray brown brush stroke in the sky area
Solution: None. It was a staining colour so I couldn't get it off.
Just left it there and finished the piece.


Mistakes Are Part of Growing

Thank God for mistakes! Yes, you heard me right. As the old idiom goes, "Failure is the mother of success." If you don't make any mistakes, you never really learn. Mistakes are part of life. They're part of growing up. They're part and parcel of growth. Mistakes help you get better - unless, of course, you think you are doing just fine (in which case you don't need any encouragement to start sketching anyway). 

Copyright Favian Ee  Feb 2013

Mistake: Went over the sky too many times.
Lessons learned: 1) This paper dries too fast.
2) For large areas of flat watercolour, don't go back over it.
If you try and correct it, you might just end up ruining it.

Copyright Favian Ee  May 2013

Avoided the same mistake with the sky.
But made another mistake with the roof :P


Do Not Be Afraid

So grab your pencil and go out there and make mistakes. Make many of them! Make new ones! Learn from old ones. Get more experienced artists to critique your drawing. After all, what's the worst that could happen? Somebody says something nasty about your art? Well, at least you tried (did they?). And you were not drawing for that person's approval (you don't even have to show it to others in the first place if you don't want to). And there may be something to learn even from the nastiest critique. Just say thank you and go do another drawing. Make it better. A bruised ego never killed anyone, but it has made a lot of people better than they once were. 


Aim for The Best

Having said that, being free to make mistakes doesn't mean we should be sloppy with our work. Of course you have the freedom to be sloppy, but you're not doing yourself any favours by accepting mediocrity and giving yourself excuses to stay bad. If you've made a mistake before, learn from it and try to avoid it the next time. But don't expect to learn the lesson perfectly and avoid that same mistake completely the second time. Learning is a process. We get better. We don't get perfect.


Copyright Favian Ee  Apr 2012
Quick sketch, A6 size. Extra vertical line at top.
Copyright Favian Ee  May 2013
One year later and A5 size. Half an hour without colour


Learn to Cover Up

A lot of the time, you can actually cover up a mistake. I'm not talking about erasing. Sometimes that works. Sometimes that will make things worse (like damage your paper surface). Sometimes the medium won't allow it. But oftentimes, there are ways to hide your mistakes. Better yet, there are ways to use your mistakes to your advantage. The excitement of using certain media like watercolours, for example, is all about "happy mistakes". Not all that is unexpected is unexpectedly bad. If all else fails, just leave them there and move on. Tell yourself it was just practice anyway. Or tell your friends with a laugh that you were exploring a new style. Don't take yourself too seriously.

Copyright Favian Ee  Jun 2013
Sometimes you can convert an inking mistake by blackening that area.
Like make it a silhouette. Or a pair of shades.


Don't Be Too Hard On Yourself

Sometimes we're our own worst critic. Oftentimes, nobody knows you made a mistake. So you missed out some details or got the perspective or proportions wrong. When you show it to a friend, they probably won't notice because they weren't there. They don't know what the real thing looks like. If your mistakes are obvious to all, tell yourself this ain't gonna be your last drawing, and it certainly won't be your best. Then go out and draw some more! One lousy drawing isn't the end of the world. Truth be told, sometimes you won't know you've made a mistake yourself until sometime down the road, you look back at your old sketches and think to yourself, "Wow. I drew THAT??" 

Copyright Favian Ee 2013

Can you spot where I made the mistake? Probably not, cos YOU WEREN'T THERE!

How to Avoid Mistakes

If you're a perfectionist and still insist on avoiding making mistakes at all costs (though that's not likely going to happen if you're a beginner), there is one way to minimize doing so:

PRACTISE. PRACTISE. PRACTISE.

Be certain you'll make many mistakes along the way. But if you learn from them, you'll be making a lot less the more you sketch. So better get those mistakes out and done with so you can get to the better stuff.