Travelling with friends can be a challenge whether or not you are all interested in sketching. Sometimes it can be more difficult to travel with other artists, especially when you're not going with a tour group. Everybody is different, and every one has his individual interests and priorities. If things become ugly and nobody wants to give way, you can go on a trip as friends and return without that friendship intact. Sad reality of life, but it happens.
I was fortunate to have went on my Western Australia trip with two friends who would have been happy to give me time to sketch if I wanted to, and they did on at least 2 occasions. They're not sketchers themselves, but they could find other things to do while I was preoccupied. On my part, I didn't want to keep them waiting all the time (and I also wanted to see too many things to stick on one spot for up to an hour each time), so on many occasions I just took photos and did my drawing at night, sometimes long after they had gone to bed. If you want to sketchpack, sometimes you have to do that. Find a time that doesn't inconvenience others, or make prior arrangements. Sketching can wait. Friendships are more valuable. No point sacrificing that just to produce a few drawings.
Thursday, October 11, 2012
Friday, October 5, 2012
5 Easy Ways to Improve Your Colouring, by Melanie Gillman
Colour can be tricky. The most important thing to know is that even when using colours, you need to know how tones work. Different colours have different values, which you will be able to see when you convert your drawing/picture/photo to black and white. That's the first rule described by Melanie Gillman below. Check out the handout she made for a colouring workshop. It's a great starting point!
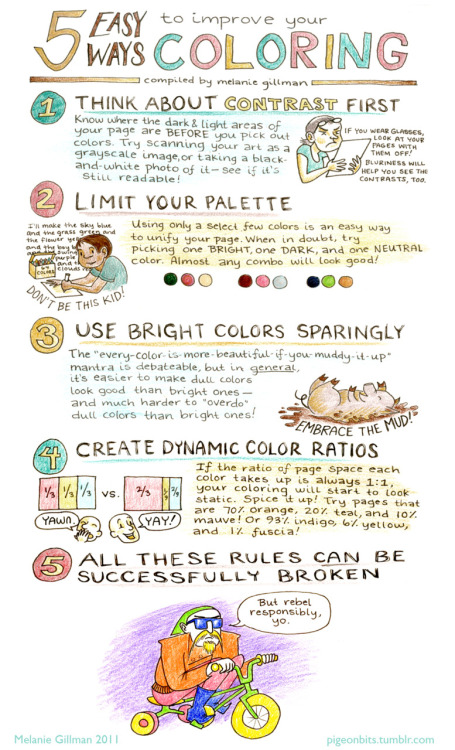
Melanie's website: http://pigeonbits.tumblr.com/post/8672102194/a-handout-i-made-for-a-coloring-workshop-im
Melanie's website: http://pigeonbits.tumblr.com/post/8672102194/a-handout-i-made-for-a-coloring-workshop-im
Tuesday, October 2, 2012
Preparing for a Sketchpacking Trip: Learning to Sketch
What could be more important for a sketchpacking trip than knowing
how to sketch? There's something to learn, even for the most experienced
sketcher, but for beginners, there are even more things to learn, and
it can sometimes be difficult and intimidating to know where and how to
start. Many would-be sketchers might think: "I'd love to sketch, but I could never do it. It's too hard!" Well, anything is hard if we think that way, but we'd be missing out on some great fun if we didn't try, right? So I figured I could give a few suggestions.
Expectations
First things first, be realistic. Nobody's going to be a Leonardo or Rembrandt the first time you put your pencil to paper. Great artists get to where they are by drawing everyday for years. It takes not only talent but a lot of discipline, dedication, and commitment. For the casual sketcher who is just starting off, it might be helpful to remember that Leonardo started off where you are now. You are at a point where the greatest artists used to be once in their lives!
Beginning with the Basics
First thing you need to know is what level you are at and what kind of sketching you want to do. Not all subjects or styles require the same skills and proficiency in those skills. If you're content with drawing stick figures and oddly shaped buildings and landscapes that don't look like the real thing, you could very well do without learning some drawing fundamentals. For that kind of drawing, you're probably more concerned with having fun and recording what you feel than recording what you see. But if you want to reproduce what you see and create beautiful looking and convincing artwork, then there are some basic rules you need to understand and learn, such as:
If you're sketching, it's not so much about creating a photograph with your hand. It's about capturing the essence, the atmosphere, the feel of the environment in that moment in time. Have fun doing it. That's the most important. These tips are here for those who want to get better at creating better drawings, not to rob you of your fun or stress you up by trying to be a Rembrandt or Leonardo.
You can learn these things from books, videos (Youtube is a great resource) or other people. Go to the library, go out with other artists on sketchwalks, go take courses! You don't become an artist overnight or in a weekend (I'm highly skeptical about those books that claim they can take total beginners and teach them to draw within a weekend). It takes time and practice, so don't be too hard on yourself if your drawings don't look like what you had in mind. If you keep at it, you can only get better :)
Expectations
First things first, be realistic. Nobody's going to be a Leonardo or Rembrandt the first time you put your pencil to paper. Great artists get to where they are by drawing everyday for years. It takes not only talent but a lot of discipline, dedication, and commitment. For the casual sketcher who is just starting off, it might be helpful to remember that Leonardo started off where you are now. You are at a point where the greatest artists used to be once in their lives!
Beginning with the Basics
First thing you need to know is what level you are at and what kind of sketching you want to do. Not all subjects or styles require the same skills and proficiency in those skills. If you're content with drawing stick figures and oddly shaped buildings and landscapes that don't look like the real thing, you could very well do without learning some drawing fundamentals. For that kind of drawing, you're probably more concerned with having fun and recording what you feel than recording what you see. But if you want to reproduce what you see and create beautiful looking and convincing artwork, then there are some basic rules you need to understand and learn, such as:
- How to handle a pencil
The humble pencil is perhaps the most versatile tool in your arsenal. It can give you different textures and tones, isn't messy like charcoal, nor unforgiving like watercolours. It can be layered, erased, dark and light, and give you broad as well as narrow lines. It is easy to pick up, and though it takes time and effort to master, it is still easier to become proficient with it than with other media.
There are several different ways to hold a pencil. Different grips are used for different drawing styles (http://drawsketch.about.com/od/learntodraw/ss/howtoholdpencil.htm). Some grips are better for fine detail, requiring smaller movements from the fingers or wrist. Other grips (like the overhand grips) are better for large broad strokes, which will require you to use the whole arm (from shoulder to elbow).
Do not underestimate the pencil. Get to know it well, and it will be your best friend.
- Tone/Value
Tone refers to the light and dark values. A familiar word may be "shading", but it's actually a little more fundamental than that. "Shading" is made up of tones. It is easier for beginners to work in black and white because handling colour can get quite confusing, but that doesn't mean your drawing will be boring if it's in only 1 colour. When you're able to handle different tones well and know how to use them to create depth, texture and mood in your drawing, you're in a better position to handle colour.
Getting different tones using the pencil is simply a matter of controlling the pressure with which applying. More pressure = darker tones. Nothing complicated like trying to mix darker blacks (when using paints) or doing cross-hatching (when using pen and ink). The trick is knowing where to put the dark and lights. One tip that artists use to see tonal values better is by squinting. When you squint, you don't see so much detail and colour, which can be overwhelming and distracting when you are trying to get the big picture into your... er... picture.
- Perspective
Ever tried drawing a building and felt that it was "not quite right"? Like maybe the ground seems to be ascending into the distance when in reality it's flat, or some objects on the ground seem to be floating in your drawing? It may be because you got your perspective wrong. No, I'm not talking about the way you're looking at a situation. Perspective is the phenomenon where things seem to recede into the distance.
While people have always seen things in perspective since the beginning of time, rules for perspective drawing were developed and proliferated in the Renaissance period. Yes, that is during Leonardo Da Vinci's time. That's why when you look at some medieval paintings, the ground plane looks quite awkward and the placement of objects in the painting look all over the place.
Drawing things in perspective is not very difficult. Learning to create perspective lines and knowing how they work can greatly help you keep the subjects in your painting grounded (pun intended). Check out these links on how perspective works and how to use it in your drawing:
http://en.wikipedia.org/wiki/Perspective_%28graphical%29
http://drawsketch.about.com/od/perspectivetechdrawing/tp/perspectiveindex.htm
- Proportion
When we talk about proportion, we're talking about relative sizes. For example, the length of your arm compared to the length of your leg. That's why some children's drawings of people have arms longer than legs. That may work for gorillas, but unless you're drawing Beast in X-men, they don't work for humans.
You use proportion when you draw something bigger because it is nearer than something smaller in the distance, or when there are differences in sizes and lengths of objects next to each other (either in 3D space in real life or 2D space on your paper). Learning to see relative sizes can help you indicate distance and size in your drawing when used together with tones and perspective. If you have seen artists hold out their pencil at arm's length, close one eye and look past it to the object they are drawing, what they're really doing is using the pencil to measure the object before they draw it on the paper. Here's how we do it:
http://www.explore-drawing-and-painting.com/how-to-draw.html
http://mccdrawing.blogspot.sg/2011/01/using-your-pencil-thumb-to-find.html
http://www.beginningartist.com/measure-like-artist-drawing-lesson.html
- Colour
Trying to reproduce on paper the colour we see in real life can be a challenge for beginners. Our eyes can see a greater range of colour (which are actually different wavelengths of light) than our paints or computer monitor can reproduce. That is why learning a bit about colour theory and how light works can help. If you're doing more cartoony style, trying to reproduce what you see may not be as important as choosing the right colours and colour-combinations to create something pleasing to the eye. A quick search on Google for "colour theory" (or "color theory" if you're American) wih give you many resources to choose from. But if you're just using graphite pencils, this may not be that necessary.
The way I see it there's a lot more space for artistic creativity in the use of colour, so don't get too hung up on it as if you're trying to do a photo-real drawing.
If you're sketching, it's not so much about creating a photograph with your hand. It's about capturing the essence, the atmosphere, the feel of the environment in that moment in time. Have fun doing it. That's the most important. These tips are here for those who want to get better at creating better drawings, not to rob you of your fun or stress you up by trying to be a Rembrandt or Leonardo.
You can learn these things from books, videos (Youtube is a great resource) or other people. Go to the library, go out with other artists on sketchwalks, go take courses! You don't become an artist overnight or in a weekend (I'm highly skeptical about those books that claim they can take total beginners and teach them to draw within a weekend). It takes time and practice, so don't be too hard on yourself if your drawings don't look like what you had in mind. If you keep at it, you can only get better :)
Sketchpacker Feature: Daniel Lim
I just got to know a new friend on a sketchwalk with the Urban Sketchers Singapore, and he posted a Youtube video of some sketches he did on his Japan trip. I thought what he shared was really great and wanted to share it with everyone. His name is Daniel Lim, and he is a cartoonist.
Here's Daniel's description of his Japan sketching in his own words:
You can find more of Daniel's sketches at the following links:
Here's Daniel's description of his Japan sketching in his own words:
Who would think of sketching a holiday? Not the usual draw-what-I-see kind landscape sketching though. That is too common. But creating holiday cartoons? Translating travel observations into cartoons and humor in real-time.
I got myself a brand new A6 Sketchbook with a couple of faithful Pilot G-Tec-C4 Black Pen when my wife and I went for our Japan holiday trip in 2008. No need for correction pen or tape. Of course I did have a digital camera with me too. That helps when I need to add in details I could not remember later.
I take mental notes during the day trips and start sketching whenever I find appropriate, amusing or unique. Sometimes I start sketching when the coach stops (else I get car sick). But most of the time I'll wait till we get back to the hotel room at the end of the tour to begin my sketch while my wife takes her shower.
The cartoons you see in the slideshow movie are not edited. They are presented as-is: i.e. drawn just the way it was done then on the go. Direct from ink to paper. In a holiday there is not luxury time for drafting and editing and erasing and stuffs. It was not my intention to draw them after our holiday either.
Alright... hope you had fun viewing them and get to know Japan a little better if you haven't been there.
Cheers.
You can find more of Daniel's sketches at the following links:
Subscribe to:
Posts (Atom)